

MATERIALS:
Peaches & Creme Worsted Weight 100% cotton yarn
- 4 ecru for skin
- 26 light blue for dress
- 1 white for apron and stockings
- 10 yellow for hair
- red floss
- organic cotton balls for stuffing
- 2.5 mm crochet hook
TECHNIQUES AND STITCHES:
magic adjustable ring http://www.planetjune.com/blog/tutorials/

chain CH
single crochet SC
reverse crochet RC (is there a better way to call it? It's as if you were doing a SC with your left hand instead of right)
double crochet DC
half double crotchet HDC
skip SK
single crochet two together Sc2tog (or skip a stitch)
2 sc into next st (or add a stitch)
PATTERN NOTES:
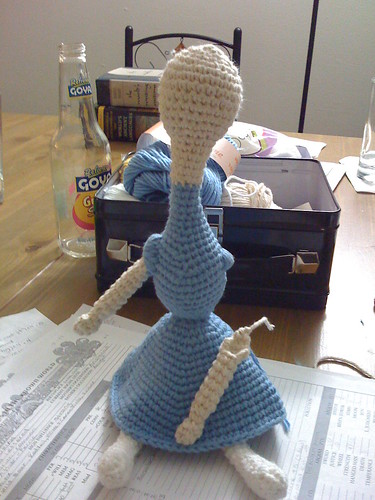
Body is one piece that is head and torso.
Skirt is then knitted onto the torso.
Arms and Legs are knit independently and sewn on.
Hair is woven into stuffed head.
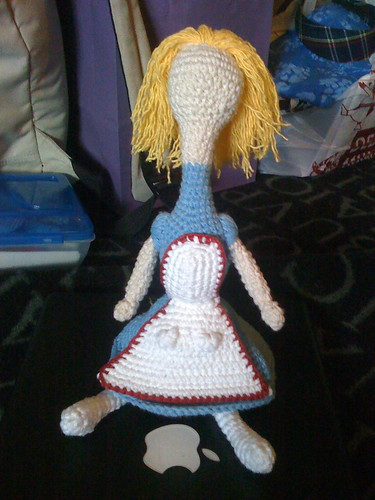
Apron is one piece, tied on.
HEAD
Work in rounds using ecru yarn.
1. Sc7 in magic ring.
2. (2 sc in next st) x 7. 14 st.
3. Sc around.
4. (Sc into next st, 2 sc into next st) x 7. 21 sts.
5. (Sc into each of next 2 sts, 2 sc into next st) x 7. 28 sts.
6-11. Sc around.
Start decreasing rounds. Stuff before hole gets too small.
12. (Sc into each of next 2 sts, sc2tog) x 7. 21 sts.
13. (Sc into next st, sc2tog) x 7. 14 sts.
14-15. Sc around.
16. (Sc2tog, Sc into each of next 5 sts ) x 2. 12 sts.
17-18. Sc around.
19. (Sc2tog, Sc into each of next 4 sts ) x 2. 10 sts.
SWITCH TO BLUE YARN.
20-22. Sc around. 10 sts.
23. (2 sc into next st, sc into each of next 4 sts) x 2. 12 sts.
24. (2 sc into next st, sc into each of next 5 sts) x 2. 14 sts.
25. (2 sc into next st, sc into each of next 6 sts) x 2. 16 sts.
26. (2 sc into next st, sc into each of next 7 sts) x 2. 18 sts.
27. (2 sc into next st, sc into each of next 8 sts) x 2. 20 sts.
28. ( sc into next st, chain, sc into same st, sc into each of next 9 sts) x 2. 24 sts. This creates the V-neck in the apron.
*This V isn't really necessary nor noticeable, so you might want to distribute additions on all four corners.
29. (2 sc into next st, sc into each of next 11 sts) x 2. 26 sts.
30. ( sc into next st, chain, sc into same st, sc into each of next 12 sts) x 2. 30 sts.
31. ( sc into next st, chain, sc into same st, sc into each of next 15 sts) x 2. 36 sts.
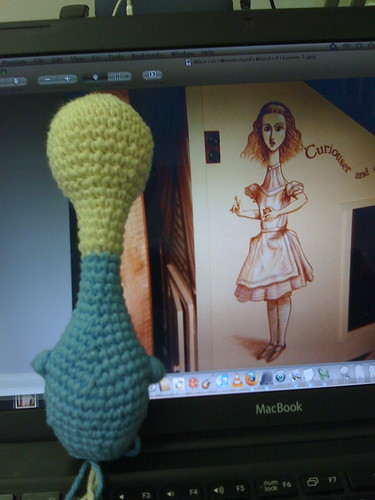
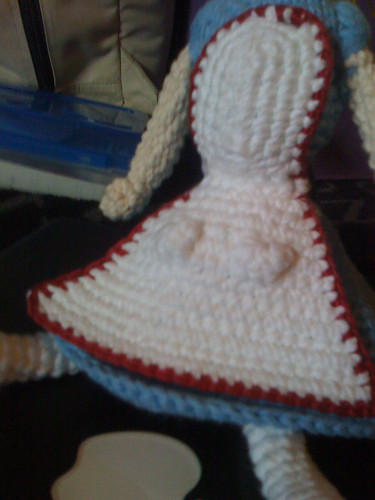
32. 2 sc into next st, sc into each of next 6 sts, 6 bobbly things linking the next 2sts, 16 scs, bobble, 8 scs. 36 sts
*bobbly thing is the technical term. You can see them in the second picture. This, too, was unnecessary, and too low for the shoulders. It was, though, quite useful once I tried to attach the arms, giving a bit of volume into the sleeve. You can just do two normal stitches into those two scs if you plan on crocheting the sleeve as part of the arm.
33. 8 scs, skip bobble, 16 scs, skip bobble, 8 scs. 32 sts.
*or skip the two stitches that would have been the bobble.
34. Sc around. 32 sts.
Start decreasing
35. (Sc2tog, 6 scs) x 4. 28 sts.
36. 6 scs, sc2tog, 13 scs, sc2tog, 5 scs. 26 sts.
37. 6 scs, sc2tog, 11 scs, sc2tog, 5 scs . 24 sts.
38. (Sc2tog, 4 scs) x 4. 20 sts.
39. (Sc2tog, 3 scs) x 4. 16 sts.
40. (Sc2tog, 2 scs) x 4. 12 sts.
Now for the BLOOMERS. Yay, CHANGE TO WHITE! Don't forget to stuff the rest of the torso.
41. Sc around. 12 sts.
42. (2 sc into next st, sc into each of next 2 sts) x 4. 16 sts.
43. (2 sc into next st, sc into each of next 3 sts) x 4. 20 sts.
44. (2 sc into next st, sc into each of next 4 sts) x 4. 24 sts.
45. (2 sc into next st, sc into each of next 3 sts) x 6. 30 sts.
46. (2 sc into next st, sc into each of next 4 sts) x 6. 36 sts.
47-50. Sc around. 36 sts.
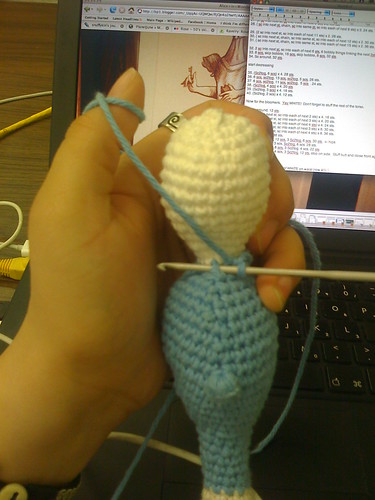
51. 6 scs, 3 Sc2tog, 12 scs, 3 Sc2tog, 6 scs. 30 sts. <- hips 52. 7 scs, Sc2tog, 13 scs, Sc2tog, 6 scs. 28 sts. 53. 4 scs, 3 Sc2tog, 8 scs, 3 Sc2tog, 4 scs. 22 sts 54. 2 scs, 3 Sc2tog, 4 scs, 3 Sc2tog. 12 sts, stop on side. Stuff butt and close front against back. BLUE Skirt! 1. Sc around, into last row of BLUE on waist (row 40). 12 sts. See third picture.
2. (2 sc into next st, sc into next st) x 6. 18 sts.
3. (2 sc into next st, sc into each of next 2 sts) x 6. 24 sts.
4. (2 sc into next st, sc into each of next 5 sts) x 4. 28 sts.
5. (2 sc into next st, sc into each of next 6 sts) x 4. 32 sts.
6 -15 (2 sc into next st, sc into each of next 7 sts) x 4. 36 sts.
COLLAR
*Yeah, I forgot this part. I wanted to add a collar to the dress, in the same fashion as I added the skirt, to the first row of blue in the neck.
1. Starting at front center, sc around, into first row of BLUE on neck (row 20). 10 sts. Turn.
2. Sc around, 10 sts.
Make sure you switch down to the blue row when you reach the center back of the neck, so the collar meets up in the front.
FEET AND LEGS - MAKE 2
*I forgot to buy black yarn, so I did all this just using white, figuring I could crochet on top of the stitches later, but was too lazy.
Work in rounds using BLACK yarn, unless WHITE is specified. Rounds 1-6 are shoe shaping, 7-18 are tights. Switching colors on a round: when you return to using the other color, carry the unused yarn loosely behind the work so the shoe does not get “squinched.”
BLACK
1. Sc 5.
2. 2 sc in first st, hdc in next st, 3 dc in next st, hdc in next st, 2 sc in last st. 9 st.
3. 2 sc in first st, sc in each of the next 3 sts, 2 sc in next st, sc in each of the next 3 sts, 2 sc in last st. 12 st.
4. 2 sc in next st, sc in each of the next 2 st, sc next st in WHITE, sc2tog in WHITE, sc2tog (first sc is WHITE, second sc is BLACK), sc in each of the next 3 sts, 2 sc in last st. 12 st.
5. Sc in first st, sc2tog, sc in next st, sc in each of the next 4 sts in WHITE, sc in next st, sc2tog, sc in last st. 10 sts.
6. Sc2tog, sc next st, sc in each of the next 5 sts in WHITE, sc2tog in WHITE. 8 sts. Stuff shoe.
FROM NOW ON, USE WHITE ALONE.
7-18. 8 sts.
Stuff leg if too floppy.
Pinching the open end flat, crochet leg slightly toward the front at the bottom of torso. This position makes it easier to make the doll sit. Add a second row of scs onto the seam to make the lace on the bloomers. (I knew I forgot to take a picture...)
HAND AND ARM - MAKE 2
Work in rounds using ECRU yarn (skin color).
1. Sc 4.
2. (2 sc into next st) x 4. 8 sts.
3. Sc around. Stuff hand and put in small magnet/metal piece, if desired.
4. (Sc2tog) x 4. 4 sts.
5. (2 sc into next st) x 4. 8 sts.
6-12. Sc around.
13. Turn, ch 1, sc 6. Turn.
14. Sk 1, sc 4. Turn.
15. Sk 1, sc 2. Turn.
16. Sk 1, sc 1.
*I would skip this last row next time for a rounder, not pointy shoulder. I didn't mind having a couple of rows that with stitches backwards, since I ended up creating the sleeve by sewing all over the last four rows.
Stuff arm if too floppy.
Sew arm on to body (around the shoulder bobbles) using BLUE yarn, always returning to the same hole in the middle of row 13 to make puffy sleeve. *See picture 6.
HAIR
Thread YELLOW yarn into scalp between stitches and pull through a couple of inches. Hold a three inch tail of yarn, and pull a loop of yarn with your hook into the hole in the center of the scalp and out at each stitch. Do two full rounds, and then skip the front ten or so stitches for the next three rounds. Once all of the hair is looped in, cut the loops open and split the plies into individual strands, to make it look like waivy hair. Finish by trimming the hair to an even length down to the collar of the dress.
APRON
I have no idea how I made up this pattern, but it's pretty much just trying to keep it all flat and facing forward. I also forgot to write down what I was doing because I was pressed for time, so you might need to adjust the number of chs at the ends of the bib to make it to the next row, without being too many.
1. Chain 9. Turn. Leave a long tail.
2. Sk 1, sc 8, ch 3. Turn keeping flat.
3. Sc in each of 8 original chain, ch 4. Turn 180 keeping flat.
4. Sc in last ch of row 2, sc 9, ch 5. Turn 180 keeping flat.
5. Sc in last sh of row 3, sc 9, ch 6. Turn 180 keeping flat.
6. Sc in last ch of row 4, sc 11, ch 7. Turn 180 keeping flat.
7. Sc in last ch of row 5, sc 11, ch 8. Turn 180 keeping flat.
8. Sc in last ch of row 6, sc 13, ch 9. Turn 180 keeping flat.
9. Sc in last ch of row 7. Turn 90 degrees.
10. DC 8 into chain, ch1. *this was going to serve as a place to weave a belt into the apron.
Here is where my need to keep it all pretty and facing forward made me learn how to crochet in reverse.
11. Rc into each of next 8 dc, ch 1. 9 sts.
12. Sc into each of next 9 rc, ch 1. 10 sts.
13. Rc into each of next 10 sc, ch 1. 11 sts.
14. Sc into each of next 11 rc, ch 1. 12 sts.
15. Rc into each of next 12 sc, ch 1. 13 sts.
16. Sc into each of next 13 rc, ch 1. 14 sts.
17. Rc into each of next 14 sc, ch 1. 15 sts.
18. Sc into each of next 15 rc, ch 1. 16 sts.
19. Rc into each of next 16 sc, ch 1. 17 sts.
20. Sc into each of next 17 rc, ch 1. 18 sts.
21. Rc into each of next 18 sc, ch 1. 19 sts.
22. Sc into each of next 19 rc, ch 1. 20 sts.
23. Rc into each of next 20 sc, ch 1. 21 sts.
24. Sc into each of next 21 rc, ch 1. 22 sts.
Take the tail from the original chain and sew it into the chains on the edges to keep them from opening up.
The pockets were crocheted onto the apron, by first picking up 6 stitches in a U shape (two going down, two going accross, and two going back up). The next row consisted of (2 sctog) x 3, and a last sc into the sc on the opposite side.
Using the RED yarn (or floss), SC all around the apron.
To tie the apron on to the doll, cut 6 strands of WHITE yarn, 12" each. Thread 3 on each side of the DCs, double up and braid. Tie a discrete knot at the end.
FACE
*You could now sew on a face, but doll faces nomally creep me out, and I suck at drawing faces to begin with... so here's Snuffy's explanation.
Use embroidery needle and 3 strands of cotton floss, knotted at the end and brought up to the face through the center hole at the bottom of the neck. Satin stitch facial features. Using brown floss, stitch eyes and eyebrows. Using pink floss, stitch mouth.
With blusher brush, gently dab tiny bit of pink blush on cheeks.


Hi,
ReplyDeleteI love this doll and would like to make it too.... but with the bloomers I have a problem, what that all means :
51. 6 scs, 3 Sc2tog, 12 scs, 3 Sc2tog, 6 scs. 30 sts. <- hips
52. 7 scs, Sc2tog, 13 scs, Sc2tog, 6 scs. 28 sts.
53. 4 scs, 3 Sc2tog, 8 scs, 3 Sc2tog, 4 scs. 22 sts 54. 2 scs, 3 Sc2tog, 4 scs, 3 Sc2tog. 12 sts, stop on side.
Stuff butt and close front against back. BLUE Skirt! 1. Sc around, into last row of BLUE on waist (row 40). 12 sts. See third picture.
Do I have still to crochet in rounds ?
Thank you a lot for your help,
kind regards from france,
ursula
The blog lost some formatting. The bloomers are just a white sphere under the blue body ball to which the legs are attached, and then you grow a skirt out of the waist. Everything is still worked in the round. Good luck!
ReplyDeletescs - single crochets
Sc2tog - single crochet two together
sts - round ends with X stitches
51. 6 scs, 3 Sc2tog, 12 scs, 3 Sc2tog, 6 scs. 30 sts. <- hips
52. 7 scs, Sc2tog, 13 scs, Sc2tog, 6 scs. 28 sts.
53. 4 scs, 3 Sc2tog, 8 scs, 3 Sc2tog, 4 scs. 22 sts
54. 2 scs, 3 Sc2tog, 4 scs, 3 Sc2tog. 12 sts, stop on side.
Stuff butt and close front against back.
BLUE Skirt!
1. Sc around, into last row of BLUE on waist (row 40). 12 sts. See third picture.